
After the last few weeks being all work and no play I was honestly prepared to put the fun back into Fabulous & Fun Fridays this week! Until I had a special request to do a tutorial teaching you how to display your artwork in a room setting without actually photographing it in a room!
It is actually quite easy to do using the free program GIMP. If you don't have this program on your computer yet you can download it HERE.
First you need to acquire some pictures of rooms with bare wall space to place your art work in. These pictures are quite easy to obtain and there are different ways of going about it. You can simply go out with your camera and take some pictures of nice settings that you like or you can find them on the net. Which ever way you choose to obtain your pictures I suggest you build a file folder on your computer to store them in. I have built a rather large collection of pictures that I have obtained using both methods above and that way I have something to match almost any work that I might want to display.
*Hint* A great place on the net to obtain these pictures are from a website for a big furniture store as they have lots of photos displaying couches and chairs with blank walls or just white space behind them.
In my collection I have built up different colored rooms consisting of either black walls, white walls, brick walls, pink walls. Different color furniture on the different color walls. Here are a few example below....


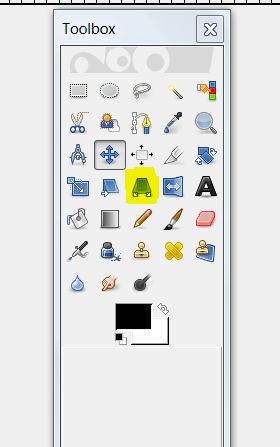
Once you have decided on your setting picture you are going to open it up in GIMP. Next you will need to open up in a separate GIMP window the art work that you would like to place in the room. Now click the edit button on the art work window and click copy. Then go back to your room picture and click paste. One of 2 things is going to happen now, either the art work is going to be too small for the room or too big. So you are going to want to scale it to size using the scale layer tool in the GIMP toolbox. (see image below)
 |
| The scale layer tool is highlighted in yellow in the image above By clicking the scale layer tool you can now simply click on the art work and drag it to size. I must remind you that your artwork is not yet anchored to the room and so you should be seeing a dotted line around it that is kind of flashing. You don't want to anchor the artwork until you have it the right size and in the right place, anchoring the artwork is going to be the very last thing you do. Once you have scaled the artwork to the right size you now need to move it into the right place using the drag tool. (see image below) |
 |
| The drag tool is highlighted yellow in the image above |
By clicking that drag tool you can then go and click anywhere on the artwork and drag it into place in the room where ever you want it. Once the artwork is in place and you are happy with it then just click anywhere outside of the artwork in the room and that will anchor the artwork and it will become one with the entire picture.


You may want to show your picture not only in a room but in a frame as well so I will just take a minute to show you that as well. You can search google images for frames and find hundreds to take your pick from and once you have found one you like all you need to do is familiar yourself with a few tools in GIMP and you will be smooth sailing from there.
 |
| As mentioned earlier this is the drag tool and by clicking on it you can then click anywhere on the object that you want to move (assuming it is not anchored down) and drag it anywhere within the picture you are placing it in. |
 |
| This is the perspective tool and by clicking it it will allow you to then click anywhere on the object that you are placing into another picture and change its perspective based on how it looks inside the other picture. By dragging its corners in or out accordingly to make it look right. |
 |
| As mentioned earlier this is the scale layer tool, by clicking this tool you can then click the object that you want to scale and drag it bigger or smaller accordingly. |
 |
| This is the shear angle tool. By clicking on this tool you will be able to shear the angles of the picture you are placing into another picture, you will just need to play with it until it looks right. The frame that I used for this tutorial was a bit too tall and narrow so before I could paste my artwork into it I had to scale layer a little differently then using the scale layer tool. The reason being I didn't want the width and height moving together so what I did was I clicked on layer at the top of the GIMP window then on scale layer, a separate box will open up and show 2 figures, one for width and one for height. You will see a little link symbol beside the 2 boxes. When you click that link it will become unlinked and you can then adjust the width and height separately, so what I wanted to do was make the frame shorter and wider. |

And below is the painting that I placed in the frame....

In order to do this after I scaled the frame shorter and wider I copied the artwork and pasted it into the frame, then before I anchored it down I used all 4 of the tools I just went over with you above to get it to look like it does above. There is no step by step way to tell you how to do this as it will be different for everyone. You simply need to play around with the tools I showed you earlier until you get it right. Once it looks good to you then you can anchor the artwork inside the frame by clicking anywhere on the frame outside of the artwork.
Once its in the frame I can then stick it into a room easily using the same method I taught you earlier, click copy on the framed artwork and paste it into a room, make the necessary adjustments to make it fit and then anchor it into place. Keep in mind that the undo button is only a click away when you are doing this. If you make a mistake or accidently anchor your artwork down prematurely then just click undo and it is like it never happened.

If anyone needs any further assistance with this project feel free to convo me on Etsy anytime and I will be happy to help. Good luck!!!!
Amazing tutorial, well written and straightforward - thank you. Haven't used Gimp before, will be downloading this weekend!
ReplyDeleteWow, this is pretty awesome. I have GIMP but I do not have nearly enough patience to do this kind of stuff. It looks great though!
ReplyDeleteomg, i am so happy i came across this tutorial. thank you so much for the straight forward approach. so simple.
ReplyDeleteand i jumped the gun. how do i save this to a jpg format?
ReplyDeleteSuch a great idea!
ReplyDelete